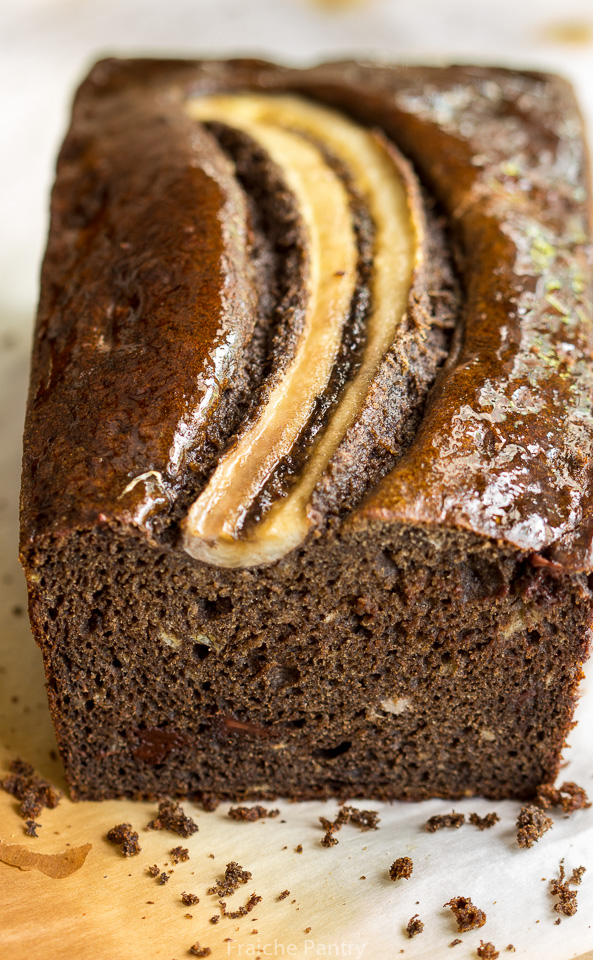
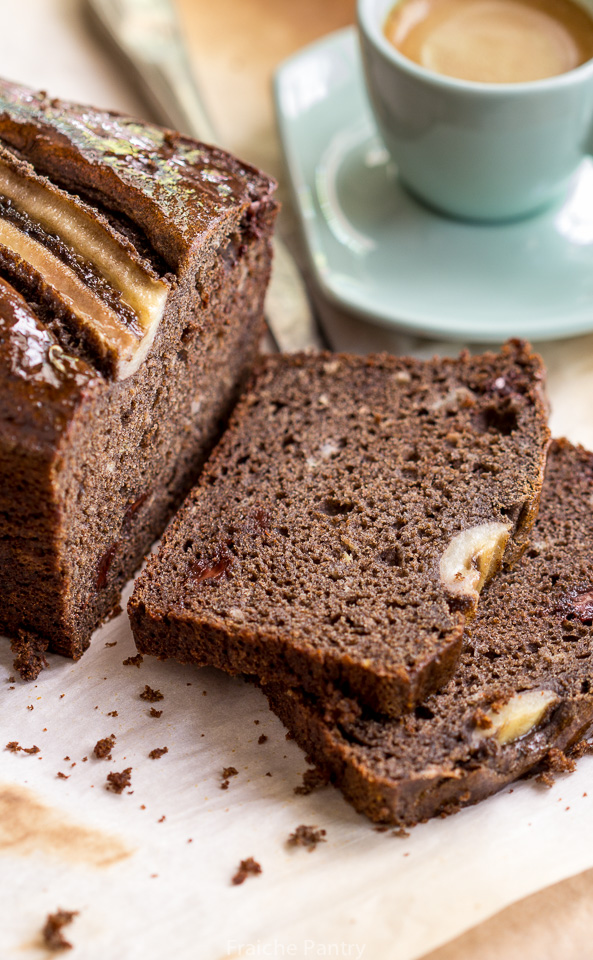
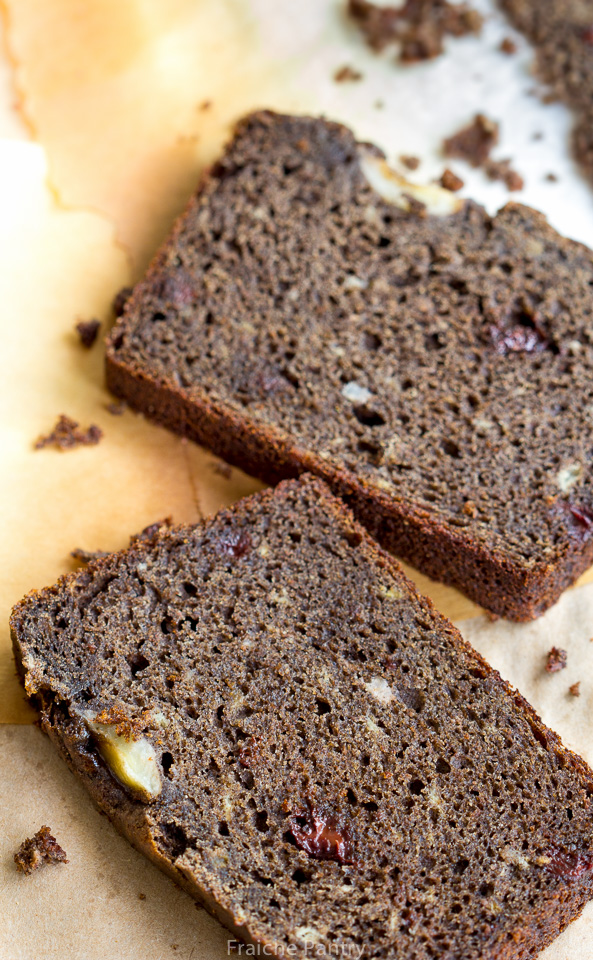
Always loved basic banana bread but this version quickly became my favorite. The first time I made it I used a 50/50 mix of plain flour and buckwheat flour – then I decided to experiment with a buckwheat only version – turning out a perfectly fluffy, moist and delicious loaf – a healthy nutritious version of an American classic.
Why buckwheat? Though I’m not gluten free, I wanted to try my hand at a healthy version of banana bread. Buckwheat is high in protein, fiber and loaded with nutrients. A great alternative to white flour baking, it has a delicious nutty flavor especially when paired with sweet ripe bananas and chocolate.
This recipe is simple and easy to make. Most of the ingredients you may already have in your pantry. All that is required is a bowl and a fork to mix the batter.
3 medium very ripe bananas, peeled + half a banana sliced lenghtwise
¾ cup sugar
2 large eggs
1 ½ teaspoon vanilla extract
¼ cup yogurt
4 tablespoons buttermilk
⅓ cup vegetable oil
½ cup chocolate chips
¼ cup dried tart cherries
Instructions
Preheat an oven to 350°F. Generously grease a non-stick metal loaf pan (preferably 1½ lb. pan) with butter.
In a bowl, combine the flour, baking powder, salt and baking soda.
In a large bowl, smash the bananas with a fork. Add the sugar, yogurt, buttermilk, oil, eggs and vanilla and mix with a spoon/fork until well blended.
Add the flour mixture to the banana mixture and stir just until blended. Gently mix in the chocolate chips and tart cherries.
Scrape the batter into the prepared pan, spreading it evenly with the spoon.
Gently lay the half banana on top of batter right in the center (optional).
Bake in preheated oven until a toothpick inserted into the center of the bread comes out clean with just a few crumbs clinging to it, about 45 to 60 minutes.
Remove the pan from the oven, set it on a wire cooling rack and let cool for 20 minutes.
Gently run a table knife along the inside edge of the pan to loosen the bread from the sides.
Using oven mitts, turn the pan on its side and slip the loaf out onto the wire rack. Let the loaf cool before serving. Makes 1 loaf.
Notes
If using 1 lb. loaf pan, batter may overflow a bit during baking
“The highlander lay dying in his bed. In death’s agony, he suddenly smelled the aroma of his favorite scones wafting up the stairs. He gathered his remaining strength, and lifted himself from the bed. Leaning agains the wall, he slowly made his way out of the bedroom…and forced himself downstairs. He leaned against the door frame gazing into the kitchen.
Were it not for death’s agony, he would have thought himself already in heaven: for there, spread out upon newspaper on the kitchen table were dozens of his favorite scones.
Was it heaven? Or was it one final act of heroic love from his devoted wife, seeing to it that he left this world a happy man?
Mustering one great final effort, he threw himself towards the table..his salivating parted lips; the wondrous taste of the scone was already in his mouth, seemingly bringing him back to life. His hand made its way to the nearest scone at the edge of the table, when it was suddenly smacked with a spoon by his wife. “Stay out of those” she said, “They’re for the funeral.”
(Highland Humor.. Scottish joke)
Ah! the smell of fresh baked scones. It never ceases to make me feel all warm and fuzzy inside.
Like Proust and his madeleines and The Highlander and his scones, we all have that one dish, smell or aroma that takes us back in time and makes us feel nostalgic . For me, scones, remind me of home. They always take me back to those cherished moments I spent as a child visiting my grandmother for an afternoon tea after school. Their familiar smell is comforting – It makes me feel home. I hope this recipe will take you back to your own cherished moments..
But before we get to the scones, let me just say: a lot has happened since I last posted. Oh, the stress of moving. Picking up and moving your entire life can be one of the most challenging times in one’s life. First, it took me two months of decluttering and packing – sifting through trash and treasures, getting rid of things I will not miss. Then another two months of unpacking and organizing. Finally, everything (well, almost) is unpacked. All my things are where they should be. My kitchen is organized – my dishes are neatly stacked in the cabinets, yet somehow, I still felt unsettled. Something was lacking – it didn’t feel like home. When my sister suggested I bake something, I realized that since we’ve moved in the new house, I haven’t cooked or baked anything. We were so busy unpacking we lived on take out. The house was lacking the smell of home cooking – the kind that brings good memories and gives us a feel of comfort and peace. It was time to bake and make this house smell and feel like “home sweet home” and what better than savoring a batch of freshly baked scones on a sunday morning…
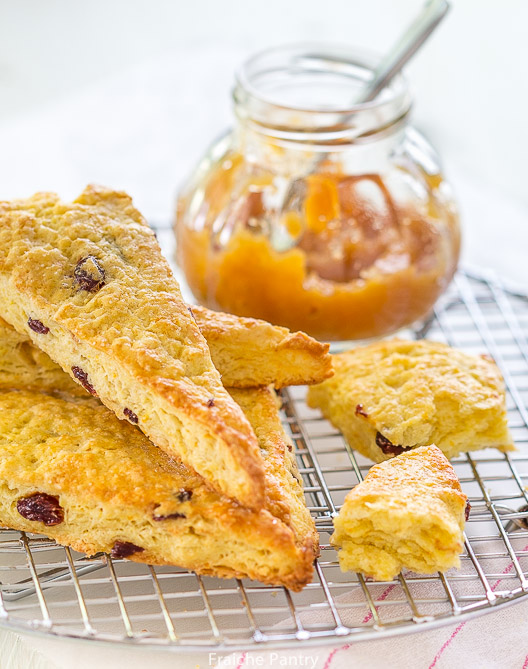
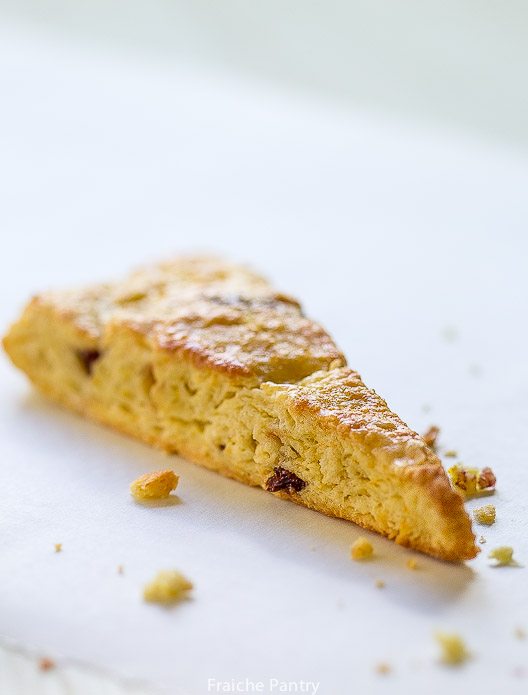
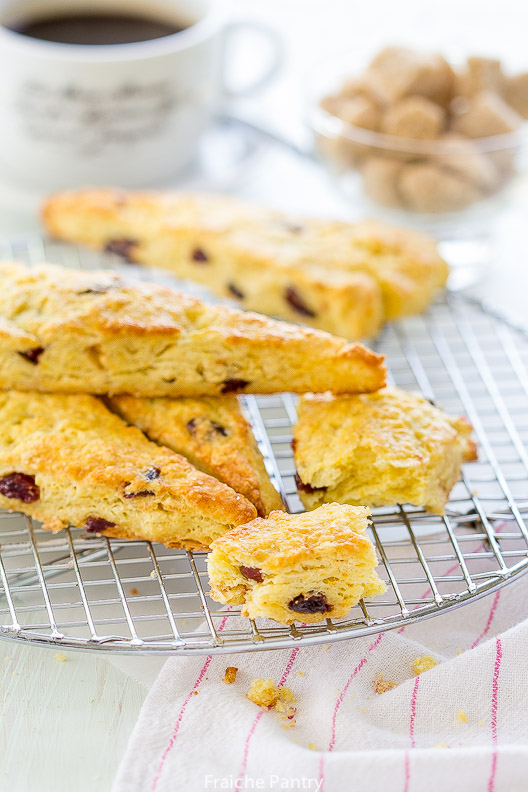
There are many debates on how to make traditional scones. To suit my own taste, I do not burden myself with authenticity. I like my scones light with crispy exterior and soft, flaky interior. Absolute freshness is key – they should be enjoyed straight from the oven.
Whipping up perfect scones, though it seems like child’s play compared to other confections, all too often result in flat dense biscuits barely worth the effort of buttering. So, remember, the less you handle dough the lighter and flakier your scones will be.
Preheat oven to 350 degrees. Line a baking sheet with parchment paper.
In a food processor combine the flour, sugar, baking powder and salt and pulse to combine. Add the butter and pulse until mixture resembles pea-size crumbs. Stir tart cherries.
If mixing by hand, combine all dry ingredients. Add cubed butter and cut into flour with your fingertips or a pastry cutter until pea-size crumbs form.
In a small bowl, combine the egg, buttermilk and orange zest. Whisk until blended and add to flour mixture. Pulse until clumps of dough form or use a fork if mixing by hand.
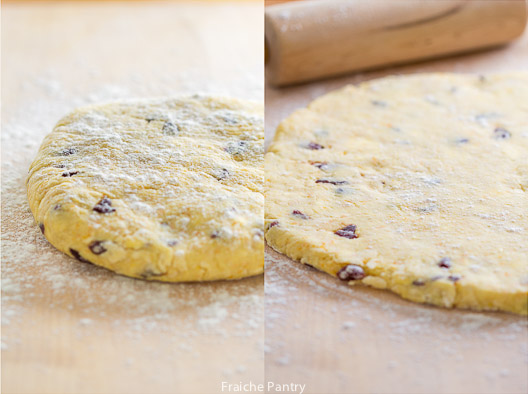
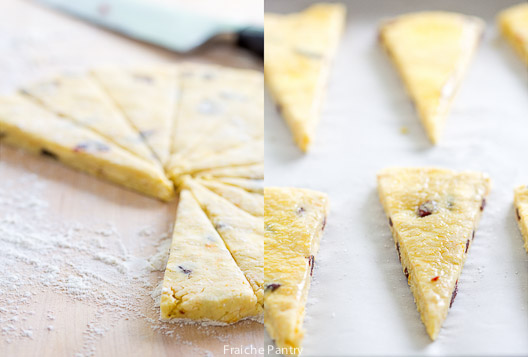
Turn the dough onto a lightly floured surface and press it together with your hands until it comes together into a ball. Roll out the dough to about ½ inch thick. Cut it into equally sized wedges or using a pastry round cutter cut it into rounds.
Place scones an inch apart onto prepared baking sheet. Brush with egg wash and sprinkle with sugar. Bake at 350 degrees for about 25 minutes or until golden. Let scones cool for few minutes before serving..
Notes
Do not overwork the dough. The less you handle it the better..
You can freeze a batch of unbaked scones for later use. First lay them on a cookie sheet lined with parchment paper. Cover with plastic wrap and freeze for an hour. Once frozen, wrap them individually in plastic wrap and use a plastic freezer bag to store them in the freezer. Glaze before baking.
If you don't have buttermilk, you can substitute by adding a tablespoon of lemon juice to a cup of milk or cream.
I could try to describe to you why I love madeleines but the truth is no one can describe madeleines like Marcel Proust. The French author made madeleines world famous in his literary masterpiece “Remembrance of Things Past”. Proust’s poetic description of what it feels like to eat a madeleine may convince you to experience your own “Proustian Madeleine Moment.”
Excerpt from “Remembrance of Things Past”:
“…one day in winter, as I came home, my mother, seeing that I was cold, offered me some tea… She sent out for one of those squat plump little cakes called “petites madeleines” which look as though they had been molded in the fluted valve of a scallop shell…
I raised to my lips a spoonful of the tea in which i had soaked a morsel of the cake. No sooner had the warm liquid mixed with the crumbs touched my palate than a shudder ran through me and I stopped, intent upon the extraordinary thing that was happening to me. An exquisite pleasure invaded my senses…
And suddenly the memory revealed itself. The taste was that of the little crumb of madeleine which on Sunday mornings at Combray… my aunt Leonie used to give me, dipping it first in her own cup of tea or tisane … and the whole of Combray and its surroundings, taking shape and solidity, sprang into being, town and garden alike, from my cup of tea.”
Marcel Proust (1871-1922)
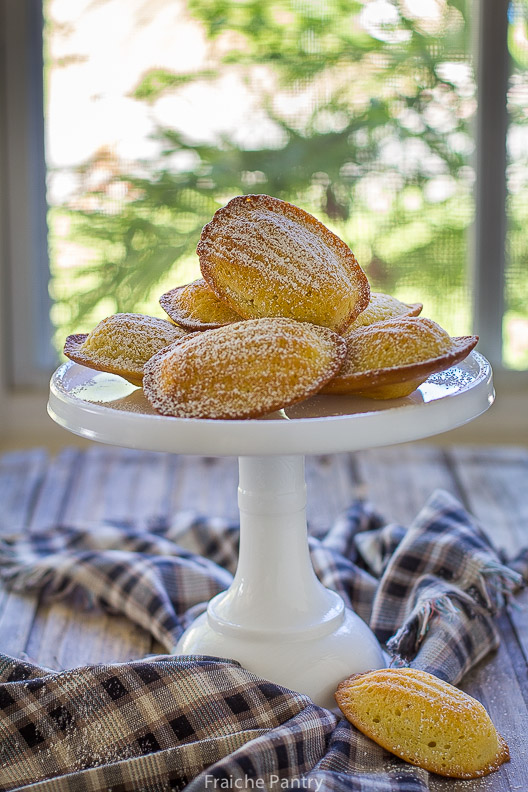
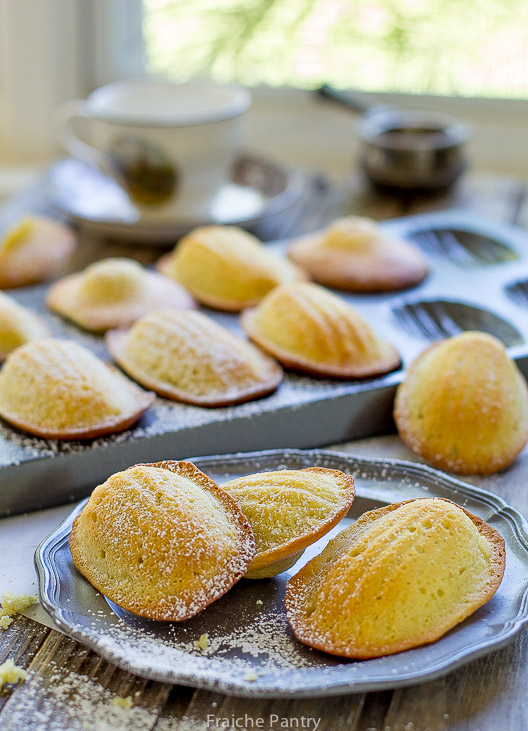
I hope this recipe for madeleines will conjure up some great memories for you.
Fun Facts:
Although typically referred to as a cookie, madeleines are actually small buttery tea cakes. There are several stories circulating about the history of madeleines. Which story is correct? No one knows. But historians believe they originated in the town of Commercy in the Lorraine region of France during the 18th century.
Things I’ve learned:
To produce plump, delicate and delicious madeleines you will need to follow few basic guidelines:
Bring cold ingredients to room temperature before making the batter
Make the batter the day before and keep it cold until ready to bake
Freshly grated lemon zest is essential. Try to use organic lemons if you can
Some say baking powder should never be used in making madeleines. In my opinion it takes a fair amount of patience and confidence to make them without any leavening agent. I find the use of baking powder makes the recipe full proof, especially if you are making madeleines for the first time.
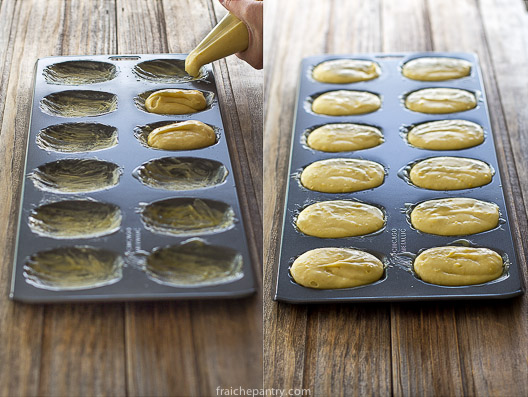
Freeze the madeleine mold for few minutes before buttering it, otherwise the melted butter will just pool in the center of each cavity (see picture below – mold on the right side was cooled in the freezer before buttering.)
When piping or scooping the batter into the mold, try to not overfill the cavities. If you notice in the picture below, I put too much batter. I was lucky it didn’t over flow. Next time I will use slightly less. No need to spread the batter. It will spread on its own.
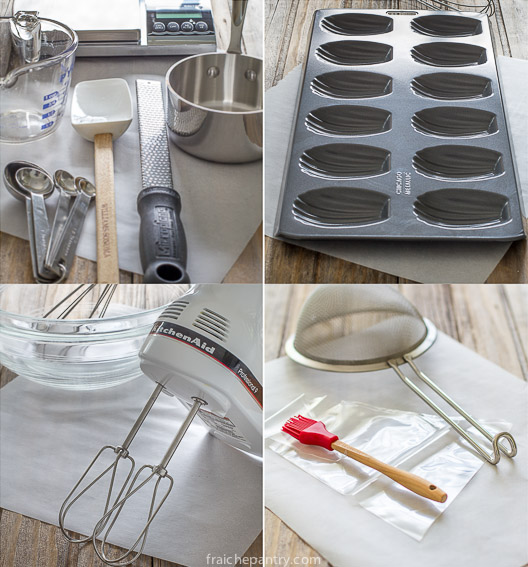
Tools you will need:
Madeleine mold (can be purchased for around $12 on amazon or at target)
Prepare the batter. In a small saucepan melt butter taking care not to burn it. Remove the saucepan from the heat pour the butter in a cup or small bowl to cool it down quickly. Sift together the flour, salt and baking powder and set aside.
In another bowl, whip the eggs and sugar until thick and pale for about 5 minutes. Gradually add the milk while mixing. Fold in the sifted flour and the lemon zest until well incorporated. Finally whisk in the butter trying to add volume to the batter. Cover the bowl with plastic wrap, and chill in the refrigerator overnight.
The next day
On the day of baking, preheat the oven to 400°F. While the oven is preheating, freeze the madeleine mold for 15 minutes. Take the mold out of the freezer and brush it generously with melted butter. Sprinkle with flour if you wish. Tap off any excess flour.
Fill a pastry bag fitted with a plain tip with the batter and pipe it into the Madeleine mold, alternatively, you can spoon the batter into the mold. Bake in the preheated oven for 5 minutes until they begin to color. Lower the oven temperature to 325°F and continue cooking for 5-7 minutes. Remove the Madeleines from the oven, unmold immediately, and leave to cool on a wire rack.
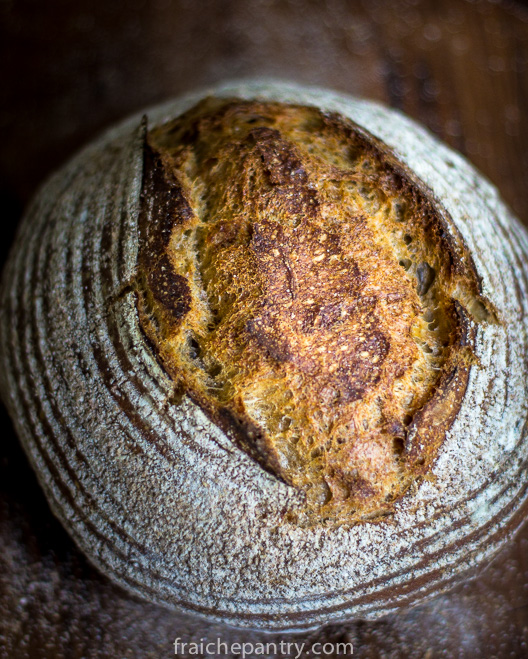
Julia Child once said: “ How can a nation be called great if its bread tastes like kleenex?”
So, does bread today taste like kleenex? pretty close in my opinion and unless you are lucky enough to live around the corner from some of the great artisan bakeries, chances are any humble loaf you make at home is far better than anything you buy at the store.
In fact some may be surprised how many people are now baking their own bread.
Thanks to a New York Times article about an old bread making technique most recently revived by Jim Lahey of Sullivan Bakery in New York, more people are enjoying homemade bread.
Once I started making my own bread I never went back to store bought loaves. I usually make this loaf with homegrown culture but for this post I am using a small amount of commercial yeast.
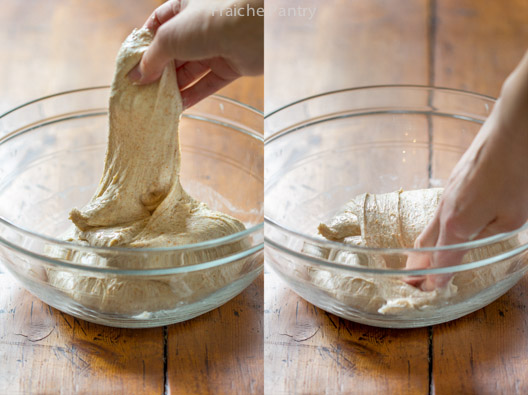
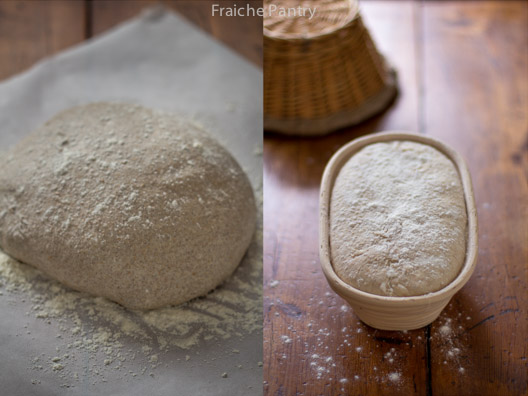
The pictures below show the stretch and fold technique.
Dough becomes smooth and puffy after couple of series of stretch and folds.
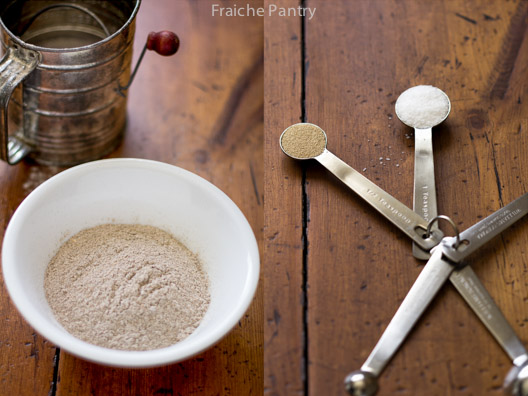
In a large bowl combine bread flour, whole wheat flour, wheat bran and wheat germ. Sprinkle the yeast over the flour mixture and stir to disperse. Add water and mix until no dry flour remain. Cover bowl with plastic wrap and let sit at room temperature for 30 minutes.
After the resting period, add the salt and a couple tbs of lukewarm water. Using wet hands, mix the dough squeezing it between your fingers until salt is thoroughly mixed in.
Cover the bowl with plastic wrap and let the dough rest for a period of 2 hours during which you will perform a series of folds every 30 minutes taking care not to deflate the dough. To do a fold, grab one side of the dough, stretch it out and folded over itself - slightly rotate the bowl and grab another side of dough and repeat the fold until you perform 4 folds (think of the dough as having four corners and you will perform a stretch and fold for every corner). This will strengthen the dough. You will do this series of folds every 30 minutes during the 2 hour resting period.
After the last fold let dough rest in covered bowl for 2 hours in the refrigerator.
If not using a proofing basket, line a medium size bowl with a dry kitchen towel. Dust it generously with flour.
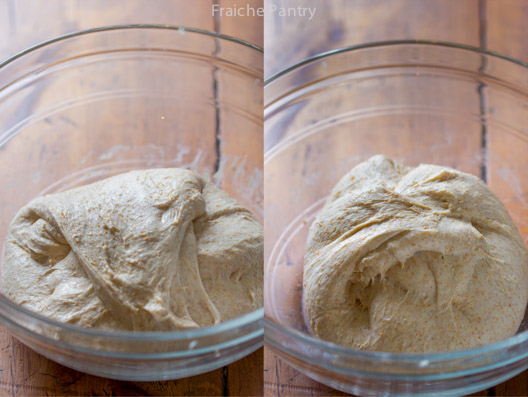
Transfer dough onto a flour dusted kitchen counter. Shape the it into a taut boule and pop it seam side up into floured lined bowl or proofing basket. Dust top of dough with flour. Loosely cover with a piece of plastic wrap and a kitchen towel on top. Leave in refrigerator overnight.
Baking day:
Place a heavy oven proof pot with lid in cold oven. Preheat to 500 degrees.
Take the dough out of the refrigerator and gently invert dough onto a piece of parchment paper.
Using oven mitts, remove hot pot from oven. With a sharp knife score dough by making two incision across the top.
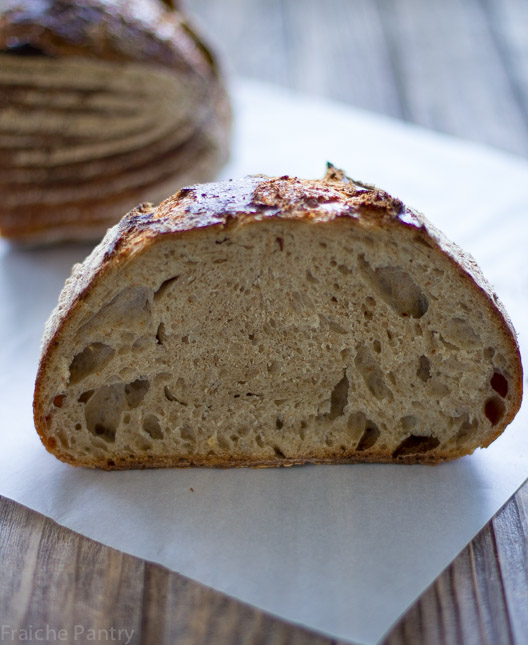
Grab sides of parchment paper and carefully lower dough into hot pan taking care not to burn yourself. Cover with lid and return to oven. Bake at 450 degrees for 25 minutes. Reduce heat to 400 - carefully remove lid and continue baking for another 20 minutes or so until crust is golden brown.
Transfer loaf to a cooling rack and let cool.
Notes
To get a nice open crumb you need a fairly wet dough about 75% hydration. Different flour brands have different absorption rate and depending on the brand you use, you may need to slowly increase the amount of water..
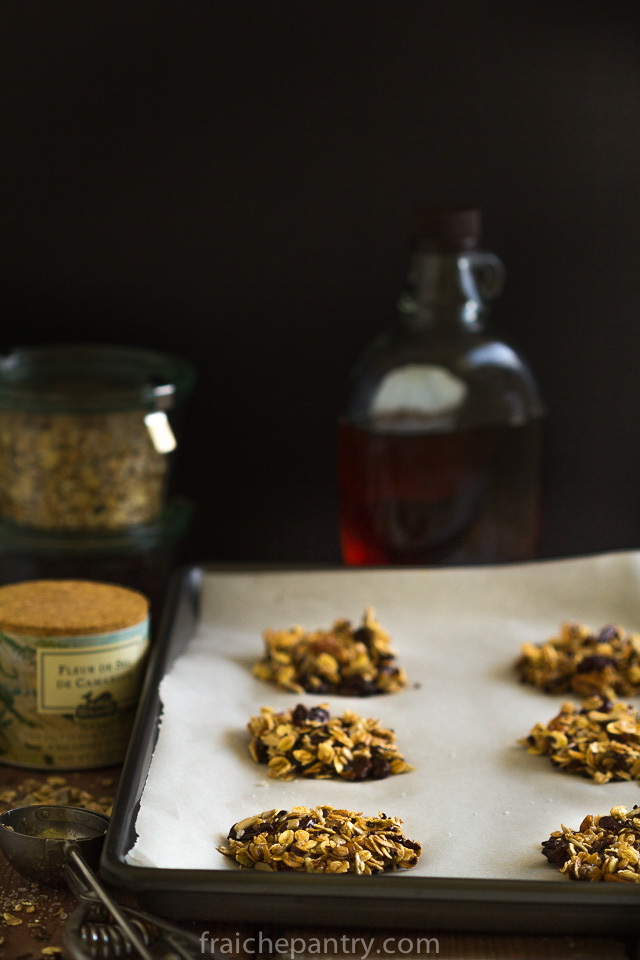
Years ago I was living in Chambery, a beautiful little town in the Rhône-Alpes region of France. There was a little cafe, where I used to stop for my mid-morning caffeine fix. I would get my cafe espresso and a small cookie called “Croustillant de Muesli Choco au Sirop D’érable” (Muesli chocolate crunch-cookie with maple syrup).
I loved those cookies. I was so addicted to them I would literally devour them by the handful. They were that crazy-good. Just the right amount of sweetness and salt. Crispy and super-crunchy. And if that wasn’t enough, they were super nutritious.
I’ve never been able to find anything like them in Southern California. Every now and then, I would get a craving for them so I decided it was time to try and make my own Croustillant de Muesli Choco.
After some online research and few recipes later, I struck out. I couldn’t find any recipe resembling the Croustillant de Muesli I had at that cafe. I decided to just start with a basic recipe for granola bars and work my way from there.
I made several attempts at replicating those wonderful cookies. My goal was to reduce the amount of sugar usually found in commercial granola bars.
One problem I kept running into is how to get the mixture to clump together without adding too much honey or maple syrup. Keep in mind, I was working from a memory of something that goes several years back.
After more research on the internet, I discovered that one of the many secrets to making homemade granola bars was to add an egg white. The lightly beaten egg white acts like a glue and helps the granola mixture stick together.
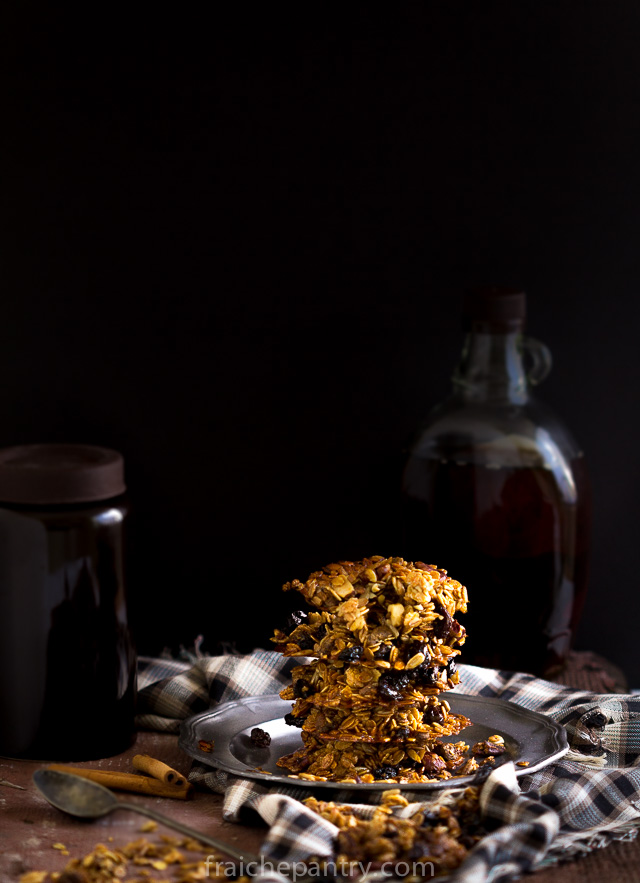
So, after few trials and lots of errors, I finally produced delicious cookies that are nutritious enough for a great breakfast or a healthy tasty snack. They are not exactly like the ones I had in France but they are darn close.
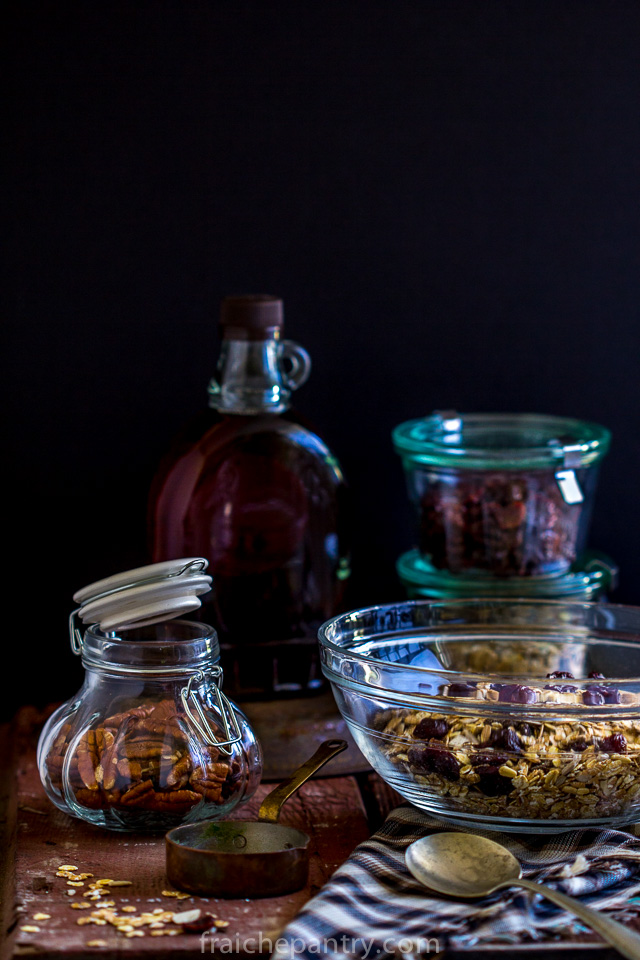
I use Bob’s Red Mill Muesli which contains rolled oats, wheat, rye, barley, almonds, dates, sunflower seeds and walnuts. I add a good quality olive oil – just enough to make them crispy and super crunchy instead of chewy.
In a small pot, mix the honey, maple syrup, vanilla and oil and heat on low until the mixture starts to simmer. Immediately, turn off the stove and let the mixture cool until it reaches room temperature.
In a large bowl, combine muesli, pecans, sesame seeds and kosher salt. Add maple syrup mixture and stir.
Let the mixture sit for about 15 to 20 minutes until it softens.
Stir in the beaten egg white. Continue working the mixture, in fact I recommend that you crush it for few seconds with the palm of your hands until it starts clumping together forming a ball.
Add, the chopped cherries, cocoa nibs and stir. Scoop the mixture onto a baking sheet using an ice cream scoop. Lightly sprinkle each cookie with Fleur de Sel and bake at 300 degrees for 20 to 25 minutes.
Notes
The cookies will still be soft right out of the oven. They will get crispy as they cool. Make sure to let them cool for at least an hour before serving.